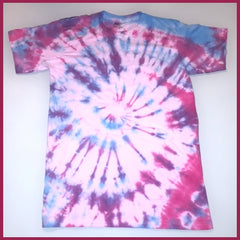
Tips For Planning Tie-Dye Designs

There are a few tricks to getting tie-dye patterns on fabric. It is always best to plan your colours and design before starting. There are many ways of creating 5 classic tie-dye looks.
- Use an online image or the fabric dye colour wheel to inspire your design.
- Start with clean, damp, fabric that is compatible with Tintex (cotton, linen, silk, nylon, acetate, rayon, wool and viscose).
- Fold, pleat, loosely gather, swirl or bunch damp material before securing.
- Elastics, string or plastic ties need to be very tight for clear colour divisions.
- Prepare enough dye solution for your fabric, darker and brighter colours use double the usual amount of Tintex.
- Apply dye solution generously so your fabric is completely saturated using a squeeze bottle or by dipping and/or submerging in your dye bath.
Plan Design Before
If needed, you can save time (and dye) by practicing techniques before. Quickly try more complicated tie-dye designs out on paper before dyeing your ‘real’ fabric. You don’t have to attempt a new design until you have had success on paper:
- Fold a piece of paper in half and draw a heart shape (ex: smiley face or ‘V’ shape etc.).
- Gather paper along line and secure with tape (or elastic).
- Use a pencil or marker to quickly mark the areas that will be dyed and open paper to see what (half of) your design could look like.
Apply Dye Generously
For the best results all fabric layers must be completely saturated in Tintex before wrapping in plastic. If needed, fabric can be re-dyed before rinsing.
If you see that a spot was missed that could make your design look unfinished, add more dye to ‘touch-up’ the area while elastics are still on. After touching up, allow your project to set with plastic for longer and rinse as usual.
Secure Elastic & Gather Fabric
Make sure all elastics are tightly secured. Using thicker string or plastic ties will make wider lines of base colour in the design. The more elastics you use the more base will show through in your design.
Folding and pleating fabric create crisper lines while gathering or loosely scrunching will create more abstract or organic pattern shapes. Decide the look you desire for your DIY project and choose a gathering technique that will compliment your design.
Bowl vs. Squeeze Bottle
Some designs will be easier & faster to execute when submerged in a dye bath (ex: bowl or sink) instead of using a squirt bottle. Using a bowl is great for single colour designs, but you can also dip different sections of your fabric into other dye colours (turn fabric and dip into colours as needed until all sides are covered in dye).
Clear Lines vs. Colour Blending
Sometimes a design will look neater is you leave a small space around elastics un-dyed (for a clearer division between dye colours). If you prefer having colours gently blend together, dyes can bleed into interesting patterns while making new colours. Primary colours red, yellow & blue combine to make secondary colours orange, green & purple. Colour theory can help you if you want to blend new dye colours together.
Saturate Hidden Layers
The 'folded technique' is a method where no ties are used to secure fabric. You can dip all the folded edges of fabric into the prepared dye bath so that even the middle layers are saturated with dye. If you are using a squeeze bottle, always check that all layers of (folded) fabric are saturated before covering in plastic.


