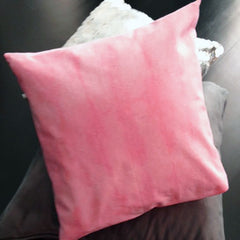
Valentine's Day Pink Tie Dye Pillow Project
Valentine's Day is almost here and we are getting into the spirit by decorating our space with more pink, red and white. We started this simple DIY pillow project using scarlet red fabric dye. Yes you can create pink using the red dye you already have. How to create custom colours is explained in more detail in the dye colour guide.
We used a plain white 12" x 12" cotton napkin and dyed it light pink. After we sewed the two squares of fabric into a cute little pillow slip. If you don't want to sew and aren't going to wash the pillow, use iron-on sticky tape or even a glue gun to finish the edges.
Tie Dye Pillow Slip Project
This project is simple enough for beginners and can be customized by using different colour that suits your style, space or seasonal event.

Materials:
- Tintex scarlet red fabric dye
- Cotton napkins
- Small pillow form
- Rubber or plastic gloves
- Rubber/elastic bands, cord or string
- Plastic cover for work area
- Plastic bucket(s), stainless steel bowls, plastic containers etc...
- Microwave or kettle
- Measuring cup
- Mixing spoon
- Scissors
- Paper towels or scrap fabric (for testing colour)
- Soap and bleach (for clean up if necessary)
- Sewing supplies (optional)
- Glue & glue gun (optional)
- Iron & iron on glue tape (optional)
- squeeze bottles (optional)
Directions:
- Before dyeing, protect work area with plastic; wear rubber (or plastic) gloves to avoid staining hands.
- Prepare dye bath by mixing scarlet red fabric dye with the hot water (visit the colour guide for more info on mixing pink); dissolve dyeing solution completely and mix with a spoon.
- Fold fabric in pleats where you want the base colour to show and attach elastic bands in different patterns. While there is no ‘right’ or ‘wrong’ way to be creative, but folding fabric in even intervals will produce more symmetrical results. The more rubber or elastic bands you use, more base colour will show through (securing tightly is ideal).
- Dip your fabric in the dye bath for up to 10 minutes and stir gently (you can also apply dye with squeeze bottles after the fabric has elastic band designs on it).
- Remove after the fabric colour is slightly darker than you want; fabric will appear darker when wet.
- Rinse until water runs clear and repeat with the next colour. When finished dyeing, remove fabric, rinse completely.
- Cut the elastic carefully.
- Clean fabric with laundry detergent by hand (or in the washing machine) and tumble dry with like colours or air dry.
- After tie dyed fabric is dry and prepared, sew the two napkins together, leaving a space to fit the pillow inside. You can use iron-on tape to secure the pillow or even a glue gun if the pillow is only for display and will not be washed.
Colour Splash Blog Related Posts
-
Dyed Paper Garland Tree Decoration
We DIY-ed a standard white paper garland from a craft sto...
-
Holiday Crafts and Decorations
How would you like to add a pop of bold red to holiday gi...


